Feeds:
Posts
Comments

Archive for the ‘Pizza’ Category

PEACHES. Holy moly, do I ever love them. I feel like this year I’ve missed a lot of the summer seasonal fruit, both because I was out of town so much during the month of July when things like raspberries and blueberries were in their heyday, but also because this year was actually not very fruitful for some of our more beloved summer fruits – mostly the stone fruits.  Why? Well, we had a wet spring, and our already-waning pollinators can’t go out in the rain to pollinate those beautiful cherry and apricot blossoms.  Not Far From the Tree has a great blog post explaining this, check it out here.  What this all means is that now that I’m finally moved and settled, I’m also ready to start cooking, baking, and preserving like a madwoman, and peaches are right on time.

I bought myself a basket of Ontario peaches, and since our dear friend Emily was coming over the next day to see our new apartment in the morning, I wanted to make some kind of breakfast cake to be enjoyed with coffee or tea.  In the recent tradition of my freestyle banana bread, I decided to essentially make the recipe up as I went along.  The problem? Well, it seems that when I cook I can remember EITHER to take photos, OR to write down the recipe I’m making up as I go.  I have yet to master the taking of pictures AND the recipe recording AND the cooking altogether.  The result this time is that I have a great new recipe for you, with no photos of the work in progress. D’oh!

The good news? I couldn’t have been happier with how this little coffee cake thing turned out.  It was just the right sweetness, a great texture, and the peaches weren’t overpowered by the other ingredients.  Without further ado, here’s my recipe – finally, an original of mine!

1 cup whole wheat flour

1/2 cup all-purpose flour (I used bread flour because it’s what I had on hand)

1/4 cup or so of regular large flake oats (this was an afterthought so I just dumped some in)

3/4 tsp of both baking soda and baking powder

1/2 tsp salt

some freshly grated nutmeg, and a generous pinch of cinnamon

Stir together those dry ingredients!

3/4 stick of butter, softened (a stick is one quarter of a 1lb block of butter, or 6/8 of a cup)

1/4 cup of white sugar

1/4 cup plus another small glug of maple syrup

1 egg

a splash of vanilla and a splash of dark rum

3/4 cup of plain yogurt

1 cup of chopped peaches

Cream together the butter, sugar and syrup, and then beat in the egg, vanilla, and rum.  Stir in the yogurt and then add the wet ingredients to the dry ingredients.  Stir until combined and then add in the peaches.  Bake in a VERY well-greased or parchment-lined loaf pan for approximately 45 minutes at 350 degrees.  You’ll have to keep an eye on it and just keep inserting a toothpick or fork to test for the cake’s doneness – for a long time it seemed like the top of mine was going to burn long before the cake was cooked, but it worked out fine.  I also sprinkled the top with some turbinado sugar before baking for that crunchy sugar topping!  A great finishing touch! Here’s what the cake looked like when it was done:

Now, since I did such a poor job of photo-documenting this tasty little creation, I’ll end with a smattering of photos of recent edible delights.  Next time I’ll do better, I promise!

Pizza with golden zucchini, caramelized onions, and fresh basil and kale from the garden!

Bread and Butter Pickles with Fresh Ginger!

Strawberry summer cake back from Canada Day weekend! Kat didn't get any and she was sad...

See you next time! I’ll keep you posted about my preserving exploits and the vegetarian creations I cook up on my brand new (drumroll!) BBQ!

Read Full Post »

The following post can be read to the tune of:

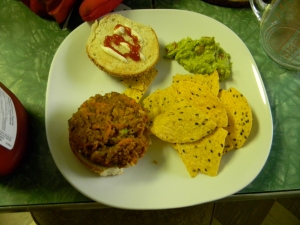
I have been a very bad blogger.  This has, most certainly, been my biggest lapse and as always, I apologize.  But rather than dwell on reasons or excuses, how about I just tell you about some delicious things?  Since it’s been so long since I’ve posted here’s a smattering of images from foods I’ve made in the last couple of months:

Buckwheat pancakes with blueberry-rhubarb compote

Shaved asparagus pizza

That last photo is of my go-to veggie burger recipe.  I’ve been making it for years, and I often crave it.  Usually I have everything for it on hand, so it’s a great recipe for when you are trying to use up things in your fridge.  The first time I had these burgers my good friend and housewife Krista Nerland made them for me and some friends, back in Montreal, many moons ago.  This was when I still ate meat, and when I thought of vegetarian food as usually lacklustre – particularly when it seemed like vegetarian “health food”.  What I’m trying to say is that I was expecting to hate these burgers, and to lie through my teeth that I liked them.  But then, I DID like them.  I was surprised.  They contained something called “bulgur” and that did not at all sound appealing.  Perhaps my now-love of delicious, natural, whole foods can be traced back to this moment.  The recipe itself is from a Moosewood cookbook – Moosewood Restaurant Cooks at Home – to be precise.

I’ve adapted this recipe slightly – mostly to make a smaller batch, and used their variation of adding chickpeas (I honestly can’t imagine these burgers without the chickpeas – I don’t think I’d like them nearly as much).  The “small” batch – the one I’m sharing here – still makes 6-8 good sized burgers.

Mince 1 garlic clove, and saute it in some oil for a couple minutes with 3/4 cup of bulgur.  Add 1 1/2 cups of boiling water, cover, and simmer for 15-20 minutes, or until the water is absorbed and bulgur is tender.  *NOTE* for years when I made this recipe I made it with fine bulgur, and never needed to actually cook it at all – I just poured the water over and covered it and let it sit (like couscous) off the heat.  This was the first time I’ve ever actually cooked it on the stove, because now I have whole bulgur which is much larger, like wheatberries (are they the same thing?!) so just note that if you have fine grain bulgur you really don’t need to cook it.

Meanwhile, assemble the following things in a mixing bowl:  1/4 cup chopped green onions, 1/4 cup grated carrot, 1/8 cup chopped parsley (I frequently use cilantro instead, and I also don’t ever measure it, I just throw a big pile in, YUM), 1/8 cup tahini, 1 tbsp. tomato paste (get the stuff in a tube and you won’t have a rotting can of paste in your fridge!), 1 tbsp. tamari, 1/2 teaspoon (or however much you like) dijon mustard, add your favourite hot sauce (optional) and salt and pepper to taste.

Mix all those things together! Then, mash 1/2 -1cup chick peas (the more you add, the harder it will be to get them to stay together, but I generally use more than the 1/2 cup the recipe calls for) and add them into the mix.  When the bulgur is ready, mix it in too.  Then form your patties (don’t burn your hands!) and place them on a parchment paper-lined baking sheet.  Bake for about 20 minutes, flipping halfway through.   You can also fry these burgers, but I gave that up a few years ago because they never stay together and they become an oily mess.  In the oven they still sometimes fall apart when you flip them (be gentle!) but it’s nowhere near as bad as the frying scenario.  But if you’re brave and wanna fry them, be my guest.

If you love chick peas and veggie burgers that don’t try to taste like meat, I hope you will like these a lot.  They are nutty, and the flavours all mingle so well.  I imagine you could alter this recipe to put your own favourite seasonings/sauces in it, but you would want to keep the same amount of binding liquid-y stuff (i.e. tahini, tomato paste, mustard) to drier grainier things if you care about them actually staying together.  Yum! Now I just want these for dinner, but that’s not what I’m having tonight.

In other news, that time of the year is here again – the time when I feel busy all the time because I need to use most of my precious non-working moments to can things.  Canning! I made two batches of jam today, which meant standing in a small, sweaty kitchen and stirring for longer than I normally would on a day off, but really it’s so easy and satisfying and it made me remember why I like preserving things so much.

I made an old favourite today – my Aunt Linda’s Christmas Jam, which I blogged about last year (and used my own blogged recipe today while making it, which Paul thought was cool), but I also made a new, slightly experimental jam.  Rosemary Rhubarb.  Now, I followed a recipe, and in theory it’s not very different from the Rhubarb Ginger jam I’ve made a few times before, but obviously the flavour combination is totally different, and I wasn’t sure what to expect.  Paul loves it.  I like it quite a bit, though it’s the kind of thing that tastes good but also confuses your brain a little bit.  I’m interested to see how other people find it, but I think that it would definitely be amazing with a good goat’s cheese and some bread.

I hope to do a lot more experimental canning this year, and I want to break away from just jam and into more challenging things – more relishes, chutneys, sauces, syrups! I also have big plans to buy a bushel of tomatoes and can them all so that I can live off them in the sad winter months.  So stay tuned, this won’t be my last sweaty stove afternoon!

Read Full Post »